PHP Basics
updated on 03/18/2025 - Now new with knowledge assessment for each chapter.
PHP (Hypertext Preprocessor) is a server-side scripting language designed for web development. Unlike client-side languages such as JavaScript, which run in the browser, PHP code is executed on the web server and generates HTML that is then sent to the client.
This learning material is based on the course content and completed practice examples. It covers the basic concepts of PHP.
Main Features of PHP
- Server-side language
- Can be embedded directly into HTML
- Code is executed on the server, results are sent to the browser
- Files have the extension
.php
Processing Flow
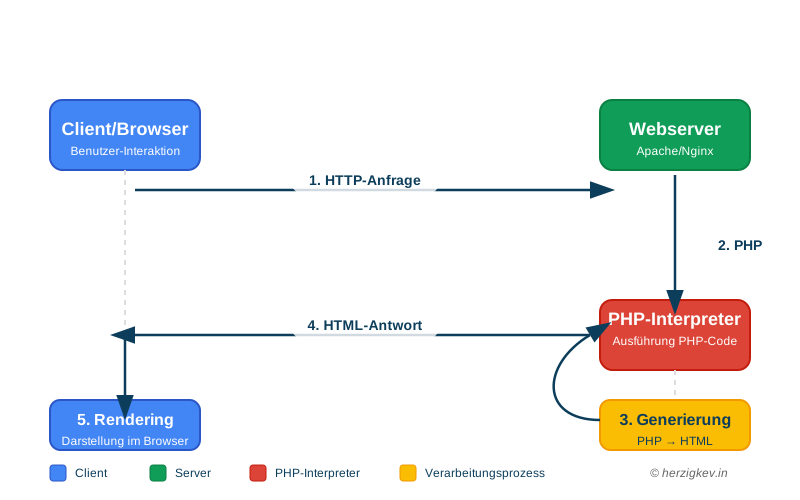
Output Stream in PHP
When processing a PHP file, the process runs as follows:
- The PHP interpreter goes through the file from top to bottom
- HTML code outside of PHP tags (
<?php ... ?>) is written directly to the output stream - PHP code within the PHP tags is executed, and its outputs (via
echo,printetc.) are also written to the output stream - The output stream is then sent to the client's browser
Example:
<!DOCTYPE html>
<html>
<head><title>Test</title></head>
<body>
<h1>Hello</h1> <!-- Directly to the output stream -->
<?php
$name = "World";
echo "<p>Hello $name!</p>"; // Processed by PHP and then written to the output stream
?>
<footer>Footer</footer> <!-- Again directly to the output stream -->
</body>
</html>This process is important to understand, especially when it comes to the correct order of outputs and header information.
Basic PHP Syntax
PHP code is written within special tags:
<?php
// PHP code goes here
?>Example from 12_php_hallowelt.php:
<?php
for($i=0; $i<1000; $i++) {
echo("<p>Hello World! " . $i . "</p>");
}
?>Important Syntax Rules
- Statements end with a semicolon
; - Variables begin with a
$sign - Comments are marked with
//for single-line or/* */for multi-line comments
PHP Output Methods
echo and print_r
PHP offers various methods for outputting content:
- echo: Outputs strings
echo("<p>Hello World!</p>"); - print_r: Displays the content of arrays in a readable form
print_r($_POST); // Outputs the content of the POST array
Examples from the course files:
// From 12_php_formulare01.php
print_r($_GET);
print_r($_POST);
print_r($_REQUEST);The ta Function (Test Output)
In the example files, a custom function ta() is used to display arrays more clearly. This function is defined in the file common.inc.php:
<?php
function ta(mixed $in):void {
echo('<pre class="ta">');
print_r($in);
echo('</pre>');
}
?>This function formats the output of print_r in a preformatted HTML element with CSS styling. The associated CSS is defined in common.css:
.ta {
margin:0.5em 0;
padding:0.5em;
border:1px solid orange;
background-color:#ffc;
font-family:"Courier New", monospace;
font-size:0.9rem;
line-height:1.2;
}Working with Forms in PHP
Form Capture
PHP provides special arrays to access form data:
$_GET: Contains data sent via the URL (GET method)$_POST: Contains data sent in the HTTP request body (POST method)$_REQUEST: Contains data from $_GET, $_POST, and $_COOKIE
HTML form example from 12_php_formulare01.php:
<!doctype html>
<html lang="en">
<head>
<title>PHP: Forms</title>
<meta charset="utf-8">
</head>
<body>
<form method="post">
<label>
Your email address:
<input type="email" name="E">
</label>
<label>
Your password:
<input type="password" name="P">
</label>
<input type="submit" value="login">
</form>
</body>
</html>Form Processing
After submitting a form, PHP can process the data:
if(count($_POST)>0) {
// Form was submitted
$email_correct = "test@test.at";
$pwd_correct = "test123";
if($_POST["E"]==$email_correct && $_POST["P"]==$pwd_correct) {
// Correct input
$msg = '<p class="success">Thank you - you will be redirected shortly.</p>';
}
else {
// Incorrect input
$msg = '<p class="error">Unfortunately, the entered data was not correct. Please try again.</p>';
}
}The CSS for success and error messages is defined in common.css:
.success {
margin:0.5em 0;
border-left:2px solid green;
font-style:italic;
line-height:1.2;
padding:0.2em 0.5em;
}
.error {
margin:0.5em 0;
border-left:2px solid red;
font-weight:bold;
line-height:1.2;
padding:0.2em 0.5em;
}Form Validation
Checking form data is an important part of web development:
PHP-side Validation
// Check if the form was submitted
if(count($_POST)>0) {
// Form was submitted
}
// Checking form data
if($_POST["E"]==$email_correct && $_POST["P"]==$pwd_correct) {
// Correct input
}HTML5 Validation
<input type="email" name="E" required>
<input type="password" name="P" required>Never rely solely on client-side (HTML5) validation. Always implement server-side validation, as client-side validation can be easily bypassed.
Uploading Files with PHP
PHP allows uploading files from the client to the server. This functionality is essential for many web applications, e.g., for profile pictures, document uploads, or media content.
File Upload Basics
To be able to upload files, the HTML form must have special attributes:
<form method="post" enctype="multipart/form-data">
<input type="file" name="document">
<input type="submit" value="upload">
</form>The attribute enctype="multipart/form-data" is mandatory for file uploads!
File Upload Process
When uploading a file, the following happens:
- The client sends the form data and the file to be uploaded to the server
- The server initially stores the file in a temporary directory under an automatically generated name
- PHP provides information about the uploaded file in the superglobal array
$_FILES - The PHP code must move the temporary file to the desired destination
- After the request is completed, the temporary file is automatically deleted if it was not moved
The temporary storage and renaming serves security purposes. If uploaded files were stored directly in the web server directory under their original name, attackers could upload PHP files or other executable scripts and execute them.
The $_FILES Array
The $_FILES array contains all information about the uploaded files:
$_FILES["fieldname"]["tmp_name"] // Temporary path and name of the file
$_FILES["fieldname"]["name"] // Original filename on the client
$_FILES["fieldname"]["full_path"] // Full path (browser-dependent)
$_FILES["fieldname"]["error"] // Error code (0 = no error)
$_FILES["fieldname"]["type"] // MIME type of the file
$_FILES["fieldname"]["size"] // Size of the file in bytesSimple File Upload
A basic example for a file upload from 14_php_upload.php:
<?php
require("includes/config.inc.php");
require("includes/common.inc.php");
ta($_FILES);
$msg = "";
if(count($_FILES)>0) {
$f = $_FILES["myUpload"]; //Helper variable
if($f["error"]==0) {
$ok = move_uploaded_file($f["tmp_name"],"./uploads/" . $f["name"]);
if($ok) {
$msg = '<p class="success">Thank you - The file ' . $f["name"] . ' was uploaded successfully.</>';
}
else {
$msg = '<p class="error">Unfortunately, the file ' . $f["name"] . ' could not be saved. Please try again.</p>';
}
}
else {
$msg = '<p class="error">Unfortunately, something went wrong with the upload. Please try again.</p>';
}
}
?>
<!doctype html>
<html lang="en">
<head>
<title>Upload</title>
<meta charset="utf-8">
<link rel="stylesheet" href="css/common.css">
</head>
<body>
<?php echo($msg); ?>
<form method="post" enctype="multipart/form-data">
<label>
Please select a file:
<input type="file" name="myUpload">
</label>
<input type="submit" value="upload">
</form>
</body>
</html>- The form has the required
enctype="multipart/form-data"attribute - Check if the
$_FILESarray contains entries - Create a helper variable
$ffor better readability - Check if an error occurred during the upload (
error==0) - Use
move_uploaded_file()to move the file from the temporary directory to the desired target folder - Create a success message or error message depending on the result
File Type Filtering
For security reasons, it's important to only allow certain file types. Example from 14_php_upload02.php:
if(count($_FILES)>0) {
$f = $_FILES["myUpload"];
if($f["error"]==0) {
if(
$f["type"]=="image/webp" ||
$f["type"]=="image/jpeg" ||
$f["type"]=="image/gif" ||
$f["type"]=="image/png" ||
$f["type"]=="image/avif" ||
$f["type"]=="image/svg+xml"
) {
$ok = move_uploaded_file($f["tmp_name"],"./uploads/" . $f["name"]);
// Further processing...
}
else {
$msg = '<p class="error">This is not an image file: ' . $f["name"] . '</p>';
}
}
}Whitelist Approach with Arrays
A more elegant method for filtering file types uses an array as a whitelist. Example from 14_php_upload02a.php:
$whitelist = ["image/webp","image/jpeg","image/gif","image/png","image/avif","image/svg+xml"];
if(count($_FILES)>0) {
$f = $_FILES["myUpload"];
if($f["error"]==0) {
if(in_array($f["type"],$whitelist)) {
$ok = move_uploaded_file($f["tmp_name"],"./uploads/" . $f["name"]);
// Further processing...
}
else {
$msg = '<p class="error">This is not an image file: ' . $f["name"] . '</p>';
}
}
}The whitelist can also be defined as a constant to prevent modifications:
define("WHITELIST",[
                "image/webp",
                "image/jpeg",
                "image/gif",
                "image/png",
                "image/avif",
                "image/svg+xml"
            ]);
Uploading Multiple Files
To upload multiple files, the multiple attribute is used on the input field and the field name is given with square brackets. Example from 14_php_upload03.php:
<input type="file" name="myUpload[]" multiple>Processing multiple files requires a loop:
$f = $_FILES["myUpload"];
for($i=0; $i<count($f["name"]); $i++) {
if($f["error"][$i]==0) {
$ok = move_uploaded_file($f["tmp_name"][$i],"./uploads/" . $f["name"][$i]);
// Further processing...
}
}Complex Example: Job Application Form
A more comprehensive example for file uploads is the job application form from 14_php_upload05_bewerbungsformular.php:
DEFINE("WHITELIST_BEWERBUNG", [
"Images" => [
"image/webp",
"image/jpeg",
"image/gif",
"image/png",
"image/avif"
],
"Documents" => [
"application/msword",
"application/vnd.oasis.opendocument.text",
"application/pdf",
"image/jpeg"
]
]);
// Processing the profile picture
$f = $_FILES["Profilbild"];
if($f["error"]==0) {
if(in_array($f["type"],WHITELIST_BEWERBUNG["Images"])) {
$ok = move_uploaded_file($f["tmp_name"],"./uploads/profilbilder/" . $f["name"]);
if($ok) {
$msg.= '<p class="success">Thank you, the profile picture has been saved.</p>';
}
else {
$msg.= '<p class="error">Sorry, an error occurred while uploading the profile picture.</p>';
}
}
else {
$msg.= '<p class="error">Your profile picture is not an image file. Back to the beginning.</p>';
}
}
// Processing the documents
$f = $_FILES["Dokumente"];
for($i=0; $i<count($f["name"]); $i++) {
if($f["error"][$i]==0) {
if(in_array($f["type"][$i],WHITELIST_BEWERBUNG["Documents"])) {
$ok = move_uploaded_file($f["tmp_name"][$i],"./uploads/dokumente/" . $f["name"][$i]);
if($ok) {
$msg.= '<p class="success">Thank you, the document ' . $f["name"][$i] . ' has been saved.</p>';
}
else {
$msg.= '<p class="error">Sorry, an error occurred while uploading the document ' . $f["name"][$i] . '.</p>';
}
}
else {
$msg.= '<p class="error">The file ' . $f["name"][$i] . ' is not an allowed document. Back to the beginning.</p>';
}
}
}<form method="post" enctype="multipart/form-data">
<fieldset>
<legend>Personal Data</legend>
<label>
First Name:
<input type="text" name="VN" required>
</label>
<label>
Last Name:
<input type="text" name="NN" required>
</label>
<label>
Email Address:
<input type="email" name="E" required>
</label>
</fieldset>
<fieldset>
<legend>Documents</legend>
<label>
Please upload a profile picture:
<input type="file" name="Profilbild" required>
</label>
<label>
Please upload all relevant documents (certificates, letters of recommendation, etc.):
<input type="file" name="Dokumente[]" multiple>
</label>
</fieldset>
<input type="submit" value="submit">
</form>In this example, different file types are accepted for different purposes: images for the profile picture and documents (PDF, Word, etc.) for the application materials. The files are stored in different directories.
Security Aspects of File Uploads
File uploads pose a significant security risk if not properly implemented. Attackers could potentially upload harmful files and execute them.
Best practices for secure file uploads:
- Always use a whitelist of allowed file types
- Limit the file size
- Store uploaded files in a separate directory outside the webroot, if possible
- Change the original names of files to avoid conflicts and security issues
- Check the file extension (not just the MIME type)
- Implement virus scans for uploaded files, if possible
// Size limit (for example 5 MB)
if($f["size"] > 5 * 1024 * 1024) {
$msg = '<p class="error">The file is too large. Maximum file size: 5 MB</p>';
return;
}
// Generating a unique filename
$newFilename = time() . '_' . mt_rand(1000, 9999) . '_' . $f["name"];
// Checking the file extension
$allowedExtensions = ['jpg', 'jpeg', 'png', 'gif', 'pdf'];
$extension = strtolower(pathinfo($f["name"], PATHINFO_EXTENSION));
if(!in_array($extension, $allowedExtensions)) {
$msg = '<p class="error">This file extension is not allowed.</p>';
return;
}Working with Sessions
Sessions allow the storage of user data across multiple page requests. Unlike the stateless HTTP protocol, where the server normally doesn't store information between client requests, sessions provide a mechanism for user identification and data storage.
A session is not the same as a login! Sessions are a technique to recognize the user, while a login is an application concept that can use sessions.
Session Concept
- Client-server communication is based on request-response
- After each communication, the connection is closed
- The server normally doesn't remember information between requests
- Sessions provide a mechanism to solve this problem and store data between page requests
Session Flow
- Client sends a request to the server (e.g., with form data)
- Server creates a unique session ID and stores an entry on the server
- Variables can be stored in the session entry (in the superglobal array
$_SESSION) - Server sends the session ID and timeout value as a cookie to the client
- Client stores this information in a session cookie
- For each subsequent request, the client sends the cookie along, and the server can recognize the session
Starting Sessions
session_start(); // Starts a session or continues an existing oneThe call to session_start() must occur before any HTML output, as it sends HTTP headers.
Session Variables
Data can be stored in the $_SESSION superglobal:
$_SESSION["logged_in"] = true;Example from 13_php_login.php:
session_start();
$_SESSION["logged_in"] = true;Session Timeout
Sessions have a limited lifetime, determined by the timeout:
- The default timeout is 24 minutes (can be configured in php.ini)
- The timeout is reset when new requests are made within this time
- After the timeout expires, the session is automatically terminated
To change the session timeout time, you can adjust the session.gc_maxlifetime
setting in php.ini or use ini_set('session.gc_maxlifetime', 3600); in your PHP code
to set it to one hour (3600 seconds), for example.
Session Security
Checking the login status:
if(!(isset($_SESSION["logged_in"]) && $_SESSION["logged_in"]===true)) {
header("Location: 13_php_login.php");
}Always use the strict comparison operator (===) when checking
session variables to avoid type conversion issues.
In a typical application with protected pages, each protected page must check if the user is logged in. This is done by verifying the session variables at the beginning of each page.
Ending Sessions
Sessions can be ended in various ways:
- Automatically after the timeout expires
- By closing the browser window (client-side cookie is deleted)
- Explicitly through a logout process
Example of a logout process from 13_php_geschuetzt.php:
if(count($_POST)>0) {
if(isset($_POST["btnLogout"])) {
// Deletes all session variables
$_SESSION = [];
// Deletes the session cookie
if(ini_get("session.use_cookies")) {
$cookieparams = session_get_cookie_params();
setcookie(session_name(),"",time()-86400,$cookieparams["path"],$cookieparams["domain"],$cookieparams["secure"],$cookieparams["httponly"]);
}
// Destroys the session
session_destroy();
}
}The above code performs the following steps:
- Deletes all variables stored in the session
- Deletes the session cookie by setting it with an expiration date in the past (24 hours back)
- Completely destroys the server-side session
Practical Example: Login System with Sessions
A typical login system with sessions consists of three main components:
Login Page (login.php)
<?php
require("includes/config.inc.php");
require("includes/common.inc.php");
$msg = "";
if(count($_POST)>0) {
$email_correct = "test@test.at";
$pwd_correct = "test123";
if($_POST["E"]==$email_correct && $_POST["P"]==$pwd_correct) {
session_start();
$_SESSION["logged_in"] = true;
header("Location: geschuetzt.php");
}
else {
$msg = '<p class="error">Unfortunately, the entered data was not correct.</p>';
}
}
?>
<!doctype html>
<html lang="en">
<head>
<title>Login</title>
<meta charset="utf-8">
</head>
<body>
<?php echo($msg); ?>
<form method="post">
<label>
Email:
<input type="email" name="E" required>
</label>
<label>
Password:
<input type="password" name="P" required>
</label>
<input type="submit" value="Login">
</form>
</body>
</html>Page Protection (geschuetzt.php)
<?php
session_start();
if(!(isset($_SESSION["logged_in"]) && $_SESSION["logged_in"]===true)) {
header("Location: login.php");
exit; // Important: Ends script execution
}
?>
<!doctype html>
<html lang="en">
<head>
<title>Protected Page</title>
<meta charset="utf-8">
</head>
<body>
<h1>Welcome to the protected area!</h1>
<p>This page is only visible to logged-in users.</p>
<form method="post">
<input type="submit" name="btnLogout" value="Logout">
</form>
</body>
</html>Logout Processing (at the beginning of geschuetzt.php)
<?php
session_start();
// Check if logout button was clicked
if(isset($_POST["btnLogout"])) {
// Delete all session variables
$_SESSION = [];
// Delete the session cookie
if(ini_get("session.use_cookies")) {
$cookieparams = session_get_cookie_params();
setcookie(session_name(),"",time()-86400,$cookieparams["path"],$cookieparams["domain"],$cookieparams["secure"],$cookieparams["httponly"]);
}
// Destroy the session
session_destroy();
// Redirect to login page
header("Location: login.php");
exit;
}
// Check if user is logged in
if(!(isset($_SESSION["logged_in"]) && $_SESSION["logged_in"]===true)) {
header("Location: login.php");
exit;
}
?>Security Risks with Sessions
Session hijacking is a common attack where an attacker tries to steal a user's session ID to impersonate them.
Security measures for sessions:
- Use HTTPS to encrypt the transmission of the session ID
- Set the
httponlyflag for session cookies to prevent access via JavaScript - Use the
secureflag so cookies are only sent over HTTPS - Implement a session timeout
- Regenerate the session ID after login with
session_regenerate_id(true) - Include the IP address or other client information in the session
// Secure login process
if(validated_login()) {
session_start();
// Discard old session ID and generate a new one
session_regenerate_id(true);
// Set session variables
$_SESSION["logged_in"] = true;
$_SESSION["user_id"] = $user_id;
$_SESSION["ip_address"] = $_SERVER["REMOTE_ADDR"];
$_SESSION["user_agent"] = $_SERVER["HTTP_USER_AGENT"];
$_SESSION["last_access"] = time();
}PHP Include and Require
PHP allows including external files:
include
Includes a file, generates a warning if the file is not found
include("includes/common.inc.php");require
Includes a file, generates an error if the file is not found
require("includes/config.inc.php");Typical example for using require in the course files:
require("includes/config.inc.php");
require("includes/common.inc.php");Content of the file config.inc.php:
<?php
error_reporting(E_ALL);
ini_set("display_errors",1);
?>Use require for critical files that are necessary for the functionality of your application,
and include for optional files.
Besides include and require, there are also the variants
include_once and require_once.
include_once
Includes a file, but ensures that it is included only once.
include_once("includes/functions.inc.php");require_once
Includes a file, ensures that it is included only once, and generates an error if the file is not found.
require_once("includes/config.inc.php");Typical Project Structure
A common structure for PHP projects might look like this:
project/
├── index.php # Home page
├── includes/ # Reusable PHP files
│ ├── config.inc.php # Configuration file
│ ├── common.inc.php # Common functions
│ └── db.inc.php # Database functions
├── css/ # CSS files
├── js/ # JavaScript files
├── images/ # Images
└── pages/ # Individual page modules
├── contact.php
├── login.php
└── profile.phpUse include_once or require_once when including function definitions
or classes to avoid duplicate definitions.
PHP Functions
Functions in PHP are defined as follows:
function ta(mixed $in):void {
echo('<pre class="ta">');
print_r($in);
echo('</pre>');
}mixed: The parameter can have different data types:void: The function doesn't return anything (return type is void)
As of PHP 8.0, types for parameters and return values can be declared, which improves code quality and reduces errors.
Example of a Function with Parameters and Return Value
function add(int $a, int $b): int {
return $a + $b;
}
$sum = add(5, 3); // Result: 8Advanced PHP Function Concepts
Functions are reusable blocks of code that perform specific tasks. They improve the readability and maintainability of the code.
Optional Parameters and Default Values
In PHP, functions can have optional parameters with default values:
function greeting($name, $language = "German") {
if($language == "German") {
return "Hallo, " . $name . "!";
} else if($language == "English") {
return "Hello, " . $name . "!";
}
}
// Call with only one parameter (default value is used)
echo greeting("Max"); // Output: Hallo, Max!
// Call with both parameters
echo greeting("Max", "English"); // Output: Hello, Max!Return Values and Typing
Functions can return different data types:
// Function with return type (from PHP 7)
function add(float $a, float $b): float {
return $a + $b;
}
// Function with different possible return types (from PHP 8)
function getData(string $id): string|array|null {
// Implementation
}Anonymous Functions/Closures
Anonymous functions (also called closures) have no name and can be stored in variables:
// Store anonymous function in a variable
$multiplier = function($x, $y) {
return $x * $y;
};
// Call anonymous function
echo $multiplier(5, 3); // Output: 15CSS Integration with PHP
Including CSS in PHP Files
<link rel="stylesheet" href="css/common.css">Various CSS files are used in the course files, such as common.css,
basic.css, and formatierung.css.
Dynamic CSS Generation
CSS can also be generated dynamically with PHP. Example of the file gemeinsam.php:
<?php
header("Content-type: text/css");
$r = "";
$a = ["./basic.css","./formatierung.css"];
for($i=0; $i<count($a); $i++) {
$r.= file_get_contents($a[$i]);
}
echo($r);
?>This PHP file reads the content of multiple CSS files and combines them into a single CSS output. The following CSS files are included:
basic.css:
* {
margin:0;
padding:0;
box-sizing:border-box;
position:relative;
}formatierung.css:
body {
background-color:#eee;
color:#333;
font-family:Arial, Verdana, sans-serif;
font-size:1em;
line-height:1.5;
}
h1 {
font-size:4rem;
font-family:"Times New Roman", serif;
}The dynamic CSS file is then included like this:
<link rel="stylesheet" href="gemeinsam.php">Dynamically generated CSS is useful for theme customizations or to combine multiple CSS files, reducing the number of HTTP requests.
Best Practices
Separation of HTML and PHP Code
For better readability and maintainability, HTML and PHP code should be separated.
Bad Practice
<?php
if(count($_POST)>0) {
echo "<p>Form was submitted</p>";
if($_POST["E"]=="test@test.at") {
echo "<p>Correct email</p>";
} else {
echo "<p>Wrong email</p>";
}
}
?>
<form method="post">
<input type="email" name="E">
<input type="submit">
</form>Good Practice
<?php
$msg = "";
if(count($_POST)>0) {
if($_POST["E"]=="test@test.at") {
$msg = "<p class='success'>Correct email</p>";
} else {
$msg = "<p class='error'>Wrong email</p>";
}
}
?>
<!doctype html>
<html lang="en">
<head>
<title>Form</title>
<meta charset="utf-8">
</head>
<body>
<?php echo($msg); ?>
<form method="post">
<input type="email" name="E">
<input type="submit">
</form>
</body>
</html>Using Helper Variables for Messages
$msg = "";
// ... Code for form processing
echo($msg); // Output of the message in HTMLStructuring Code with include/require
Reusable code should be moved to separate files, as shown in the course files:
config.inc.php: Contains configuration settings (e.g. error reporting)common.inc.php: Contains commonly used functions liketa()
// Main file
require("includes/config.inc.php");
require("includes/common.inc.php");
// Now the configurations and functions can be used
?>Moving reusable code to separate files improves maintainability and reduces duplication.
Error Handling in PHP
Proper configuration of error reporting is important for development and production use. In the file config.inc.php, error reporting is activated:
<?php
error_reporting(E_ALL);
ini_set("display_errors",1);
?>error_reporting(E_ALL): Activates reporting for all error typesini_set("display_errors",1): Shows error messages in the browser
In production, display_errors should be disabled to protect sensitive information. Instead, errors should be written to log files.
Advanced Error Handling
- Notice: Non-critical errors, e.g., accessing undefined variables
- Warning: Important errors that do not interrupt execution
- Fatal Error: Critical errors that abort execution
- Parse Error: Syntax errors in PHP code
Configuring Error Reporting
Various error settings can be made in the php.ini file:
; Error reporting
error_reporting = E_ALL
; Display errors
display_errors = On
; Store errors in log file
log_errors = On
; Path to error log file
error_log = /path/to/error.logFinding php.ini in XAMPP
In XAMPP, you can typically find the php.ini file at:
- Windows:
C:\xampp\php\php.ini - macOS:
/Applications/XAMPP/xamppfiles/etc/php.ini - Linux:
/opt/lampp/etc/php.ini
On many servers, you don't have direct access to php.ini. In this case, you can use the
ini_set() function to make settings in the script.
// Activate error reporting
ini_set('display_errors', 1);
ini_set('display_startup_errors', 1);
error_reporting(E_ALL);try/catch for Error Handling
For systematic error handling, the try/catch mechanism can be used:
try {
// Code that might cause an error
$result = 10 / 0; // Division by zero causes an error
} catch (Exception $e) {
// Error handling
echo "Error occurred: " . $e->getMessage();
} finally {
// This code is always executed, regardless of whether an error occurred
echo "Processing completed.";
}PHP Security Basics
Protection Against Unauthorized Access
Example for protecting a page using sessions:
<?php
session_start();
if(!(isset($_SESSION["logged_in"]) && $_SESSION["logged_in"]===true)) {
header("Location: 13_php_login.php");
}
?>Redirection with header()
The header() function redirects the user to another page:
header("Location: 13_php_geschuetzt.php");No output must occur before header()! The call must take place before any HTML or echo output.
Example of a login process:
<?php
require("includes/config.inc.php");
require("includes/common.inc.php");
$msg = "";
if(count($_POST)>0) {
$email_correct = "test@test.at";
$pwd_correct = "test123";
if($_POST["E"]==$email_correct && $_POST["P"]==$pwd_correct) {
session_start();
$_SESSION["logged_in"] = true;
header("Location: 13_php_geschuetzt.php");
}
else {
$msg = '<p class="error">Unfortunately, the entered data was not correct.</p>';
}
}
?>Secure Forms
- Server-side Validation: Always check form data on the server
- Client-side Validation: With HTML5 attributes like
requiredand typeemail - Password Protection: Using the
passwordtype for password fields
<form method="post">
<label>
Email address:
<input type="email" name="E" required>
</label>
<label>
Password:
<input type="password" name="P" required>
</label>
<input type="submit" value="login">
</form>In a real application, passwords should never be stored in plain text, but always hashed (e.g., with password_hash()).
File System in PHP
PHP offers various functions to interact with the file system. This includes creating, reading, and managing directories and files.
Access to the file system is an important component of many web applications, for example when storing uploaded files or organizing content.
Creating Directories
New directories can be created with the mkdir() function:
mkdir($directory_path, $permissions, $recursive);Example from 15_php_mkdir.php:
<?php
require("includes/config.inc.php");
require("includes/common.inc.php");
$msg = "";
$vz = "./a/b/c/d";
if(!file_exists($vz)) {
$ok = mkdir($vz,0755,true);
if($ok) {
$msg = '<p class="success">The desired directory was successfully created.</p>';
}
else {
$msg = '<p class="error">The desired directory could not be created successfully.</p>';
}
}
else {
$msg = '<p class="error">This directory already exists.</p>';
}
?>Caution is advised when using mkdir() with user inputs. The third argument true enables recursive directory creation, which can pose a security risk.
Example for more secure directory creation from 15_php_mkdir01a.php:
<?php
if(count($_POST)>0) {
$vz = trim($_POST["VZNeu"]);
if(!file_exists($vz)) {
$ok = mkdir($vz,0755); //recursion is not recommended when working with user data
if($ok) {
$msg = '<p class="success">The desired directory was successfully created.</p>';
}
else {
$msg = '<p class="error">The desired directory could not be created successfully.</p>';
}
}
else {
$msg = '<p class="error">This directory already exists.</p>';
}
}
?>The directories for upload files can also be created programmatically, as seen in the example from 15_php_upload05_bewerbungsformular.php:
// ---- Create directories: ----
$user_root = "./uploads/" . $_POST["E"] . "/";
$ok = false;
if(!file_exists($user_root)) {
$ok = mkdir($user_root,0755);
if($ok) {
$ok = mkdir($user_root."profilbild",0755);
if($ok) {
$ok = mkdir($user_root."dokumente",0755);
}
}
}
// --------------------------------Reading Directories
The content of a directory can be read with the scandir() function:
$content = scandir($directory_path);Example from 15_php_scandir.php:
<?php
$content = scandir("./"); //reads the content of the given directory and stores the names of the files, directories, and links found there in an array
//ta($content);
echo('<ul>');
foreach($content as $d) {
switch(true) {
case is_dir("./" . $d):
echo('<li class="dir">' . $d . '</li>');
break;
case is_file("./" . $d):
echo('<li class="file">' . $d . '</li>');
break;
case is_link("./" . $d):
echo('<li class="link">' . $d . '</li>');
break;
}
}
echo('</ul>');
?>The scandir() function also returns the entries "." (current directory) and ".." (parent directory). These should generally be filtered out of the display.
Improved example from 15_php_scandir01a.php with filtering of "." and "..":
$vz = "./";
$content = scandir($vz);
echo('<ul>');
foreach($content as $d) {
if($d!="." && $d!="..") {
switch(true) {
case is_dir($vz . $d):
$cls = "dir";
break;
case is_file($vz . $d):
$cls = "file";
break;
case is_link($vz . $d):
$cls = "link";
break;
}
echo('<li class="' . $cls . '">' . $d . '</li>');
}
}
echo('</ul>');Recursive Directory Reading
Recursion is a concept in programming where a function calls itself. This is particularly useful when a problem can be broken down into smaller, identical sub-problems. For directory structures, recursion is ideal since each subdirectory can be read according to the same principle as the parent directory.
Basic Principle of Recursion
When recursively processing directory structures, the following schema is applied:
- Read the current directory
- For each element, check if it is a directory
- If yes: The function calls itself with the path of the subdirectory
- If no: The element is processed (e.g., displayed)
Example from 15_php_scandir01b.php:
function readDir(string $vz):void {
$content = scandir($vz); // Step 1: Read directory content
echo('<ul>');
foreach($content as $d) {
if($d!="." && $d!="..") { // Ignore current and parent directories
if(is_dir($vz.$d)) { // Step 2: Check if element is a directory
echo('<li class="dir">' . $d);
// Step 3: Recursive call for subdirectories
// ---- Recursion: ----
// A function that calls ITSELF with CHANGED parameters
// ("actual parameters"; different directory paths)
readDir($vz.$d."/");
// --------------------
echo('</li>');
}
else {
// Step 4: Processing non-directories
if(is_file($vz.$d)) {
echo('<li class="file">' . $d . '</li>');
}
else {
echo('<li class="link">' . $d . '</li>');
}
}
}
}
echo('</ul>');
}Visual Example of the Recursive Process
Assume we have the following directory structure:
root/
                ├── file1.txt
                ├── directory1/
                │   ├── file2.txt
                │   └── subdirectory/
                │       └── file3.txt
                └── directory2/
                    └── file4.txt
The recursive process would then be:
- Call
readDir("root/") - Display
file1.txtas a file - For
directory1:- Display
directory1as a directory - Recursive call:
readDir("root/directory1/")- Display
file2.txtas a file - For
subdirectory:- Display
subdirectoryas a directory - Recursive call:
readDir("root/directory1/subdirectory/")- Display
file3.txtas a file - Return to the calling context
- Display
- Return to the calling context
- Display
- Return to the calling context
- Display
- Display
- For
directory2:- Display
directory2as a directory - Recursive call:
readDir("root/directory2/")- Display
file4.txtas a file - Return to the calling context
- Display
- Display
Recursion can lead to memory overflows if the nesting depth becomes too large. For very deep directory structures, either the recursion depth should be limited or an iterative approach should be chosen. PHP has a default limit for recursion depth (usually 100-1000 calls), which can be configured in php.ini with xdebug.max_nesting_level.
Important Aspects of Recursive Functions
- Base Case (Termination Condition): Every recursion needs a base case where the recursion ends. In our example, the base case is reached when a directory no longer contains subdirectories.
- Call Stack: With each recursive call, the current state is placed on the call stack. Only when the recursive call is finished is the previous state restored.
- Recursion Depth: The number of nested calls is called the recursion depth. The deeper the directory structure, the higher the recursion depth.
Improved example with error handling and user input from 15_php_scandir02.php:
function readDir(string $vz):void {
// Security check: Checks if the path exists
if(file_exists($vz)) { //checks if a path exists (not: if a file exists --> wrong interpretation of the command name)
$content = scandir($vz);
echo('<ul>');
foreach($content as $d) {
if($d!="." && $d!="..") {
if(is_dir($vz.$d)) {
echo('<li class="dir">' . $d);
// Recursive call for each subdirectory
readDir($vz.$d."/");
echo('</li>');
}
else {
if(is_file($vz.$d)) {
echo('<li class="file">' . $d . '</li>');
}
else {
echo('<li class="link">' . $d . '</li>');
}
}
}
}
echo('</ul>');
}
}
// Using the recursive function with user input
if(count($_POST)>0) {
$_POST["VZPfad"] = trim($_POST["VZPfad"]); //removes leading/trailing whitespace from a string
if(strlen($_POST["VZPfad"])>0) {
readDir($_POST["VZPfad"]);
}
}Recursion is particularly useful for:
- Traversing hierarchical data structures (like directory structures)
- Generating menu structures from directories
- Creating sitemaps
- Synchronizing directory structures
- Backup processes that need to secure complete directory trees
Caution should be exercised when using user inputs for paths. Unrestricted access to the file system can pose a security risk. It should always be validated that the user can only access allowed directories. Possible security measures are:
- Restriction to certain base directories
- Prevention of access to critical system areas
- Checking for ".." in the path to prevent leaving the allowed directory area
Important File System Functions
PHP offers various functions for working with the file system:
file_exists($path): Checks if a path (file or directory) existsis_dir($path): Checks if it is a directoryis_file($path): Checks if it is a fileis_link($path): Checks if it is a symbolic linkfilesize($file): Determines the size of a file in bytesfiletype($path): Determines the type of a path
mkdir($path, $permissions, $recursive): Creates a directoryrmdir($path): Deletes an empty directoryscandir($path): Reads the content of a directoryunlink($path): Deletes a filerename($old_path, $new_path): Renames a file or directory or moves itcopy($source, $destination): Copies a file
A practical example for combining file upload and directory creation is creating user-specific upload directories, as seen in the following code:
// Create directory structure for a new user
            $user_email = "user@example.com";
            $user_dir = "./uploads/" . $user_email . "/";

            if(!file_exists($user_dir)) {
                mkdir($user_dir, 0755);
                mkdir($user_dir . "images", 0755);
                mkdir($user_dir . "documents", 0755);
            }
The difference between path and filename:
- Filename: Just the name of the file, e.g.
file.txt - Path: Complete path to the file, e.g.
/directory/subdirectory/file.txt
When specifying paths in PHP, note:
- Relative paths begin with
./(current directory) or../(parent directory) - Absolute paths begin with a slash
/or a drive letter (on Windows) - When concatenating paths, pay attention to the slashes:
$path . "/" . $file
Summary
This learning material covers the basics of PHP, with a special focus on:
- PHP syntax and output methods
- Form processing and validation
- Sessions for user management
- Code organization with include/require
- CSS integration and dynamic CSS generation
- Error handling and reporting
- Security basics
Through the combination of theoretical concepts and practical examples from the course files, a comprehensive understanding of PHP basics should be achieved.